Hey there! As a supplier of Mixing Reactors, I'm super stoked to walk you through the installation process of these nifty machines. Whether you're a newbie in the industry or just looking to brush up on your knowledge, this blog post is for you. So, let's dive right in!
Pre-Installation Checks
Before you even think about getting your hands dirty with the actual installation, there are a bunch of pre-installation checks you need to do. First things first, make sure you've got the right space for your Mixing Reactor. It needs to be on a flat, stable surface that can support its weight, especially when it's full of whatever you're mixing. You don't want it tipping over and causing a huge mess!


Another crucial step is to check all the components that come with your Mixing Reactor. Look for any signs of damage during shipping, like dents, scratches, or loose parts. If you spot anything off, reach out to us right away, and we'll sort it out. It's also a good idea to have all the necessary tools ready. You'll typically need wrenches, screwdrivers, and maybe a level to make sure everything is installed perfectly straight.
Site Preparation
Once you've done your pre-installation checks, it's time to prep the site. Clean the area where the Mixing Reactor will go. Remove any debris, dust, or obstacles that could get in the way. If the surface isn't level, you might need to use shims or other leveling materials to make it so. This is really important because an uneven surface can put stress on the reactor and lead to problems down the line.
You'll also want to think about the utilities. Make sure there's access to power, water, and any other fluids or gases that the reactor will need. Check the electrical connections to ensure they can handle the power requirements of the Mixing Reactor. If you're not sure about any of this, it's always a good idea to consult an electrician or a professional who knows their stuff.
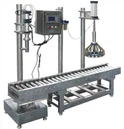
Unloading and Positioning
Now that the site is ready, it's time to unload the Mixing Reactor. Be really careful during this step because these things can be heavy and bulky. Use a forklift or other appropriate lifting equipment to move it to the installation site. Once it's there, position it exactly where you want it. Use the level to make sure it's perfectly horizontal and vertical. This will ensure that the mixing process works as it should and that there are no leaks or other issues.
Connecting the Piping
One of the most important parts of the installation process is connecting the piping. This includes the inlet and outlet pipes for the fluids or gases that will be used in the reactor. Make sure you use the right type of pipes and fittings for the materials you'll be handling. For example, if you're working with corrosive substances, you'll need pipes that are resistant to corrosion.
When connecting the pipes, use the appropriate sealing materials to prevent leaks. Tighten the connections securely, but don't over-tighten them, as this can damage the pipes or fittings. It's also a good idea to label the pipes so you know which one is which. This will make maintenance and troubleshooting a lot easier in the future.
Electrical Connections
Next up, it's time to make the electrical connections. This is a critical step, so if you're not an electrician, it's best to hire one. The Mixing Reactor will have a control panel that needs to be connected to the power supply. Make sure all the wires are properly insulated and that the connections are secure.
Test the electrical system before you start the reactor. This will help you identify any issues early on and prevent any damage to the equipment. If everything checks out, you're ready to move on to the next step.
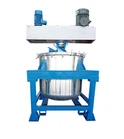
Installing the Agitator
The agitator is a key component of the Mixing Reactor. It's responsible for mixing the contents of the reactor to ensure a homogeneous mixture. Install the agitator according to the manufacturer's instructions. Make sure it's properly aligned and balanced. A misaligned or unbalanced agitator can cause vibrations and reduce the efficiency of the mixing process.
Once the agitator is installed, test it to make sure it's working properly. You can do this by running it at a low speed and checking for any unusual noises or vibrations. If you notice anything wrong, stop the agitator immediately and check the installation.
Testing and Commissioning
After you've installed all the components, it's time to test and commission the Mixing Reactor. Fill the reactor with water or a test fluid and run it through a test cycle. Check for any leaks, abnormal noises, or other issues. Monitor the temperature, pressure, and other parameters to make sure they're within the acceptable range.
If everything goes well during the test, you can start using the Mixing Reactor for its intended purpose. However, it's a good idea to keep an eye on it for the first few days to make sure there are no hidden problems.
Maintenance and Support
Once your Mixing Reactor is up and running, regular maintenance is crucial to keep it in top condition. Follow the manufacturer's maintenance schedule and guidelines. This might include things like lubricating the moving parts, checking the seals, and inspecting the electrical system.
If you ever run into any problems with your Mixing Reactor, don't worry! We're here to support you. As a supplier, we offer comprehensive after-sales support, including technical advice, spare parts, and even on-site maintenance if needed.
Consideration of Movable Tank and Vessel
If you're looking for more flexibility in your operations, you might want to consider a Movable Tank and Vessel. These can be easily moved around your facility, allowing you to use them in different locations as needed. The installation process for a movable tank and vessel is similar to that of a Mixing Reactor, but there are some additional considerations.
For example, you'll need to make sure the tank is properly secured when it's in use to prevent it from moving or tipping over. You'll also need to ensure that the connections for the fluids and gases are flexible enough to allow for movement.
Conclusion
Well, there you have it! That's the installation process of a Mixing Reactor in a nutshell. It might seem like a lot of work, but if you follow these steps carefully, you'll have your reactor up and running in no time. And remember, if you have any questions or need any help along the way, we're just a call or an email away.
If you're interested in purchasing a Mixing Reactor or a Movable Tank and Vessel, we'd love to chat with you. Our team of experts can help you choose the right equipment for your needs and guide you through the installation process. So, don't hesitate to reach out and start the conversation.
References
- Mixing Reactor Manufacturer's Manual
- Industry Standards for Chemical Reactor Installation